Portable, sweet, and perfectly portioned, these no-bake caramel apple dessert cups deliver all the cozy flavors of fall in a cool, creamy, and crunchy treat. With layers of buttery cookie crust, rich caramel pudding, and tender cinnamon apples, these little cups are a hit at any gathering—and they require zero oven time.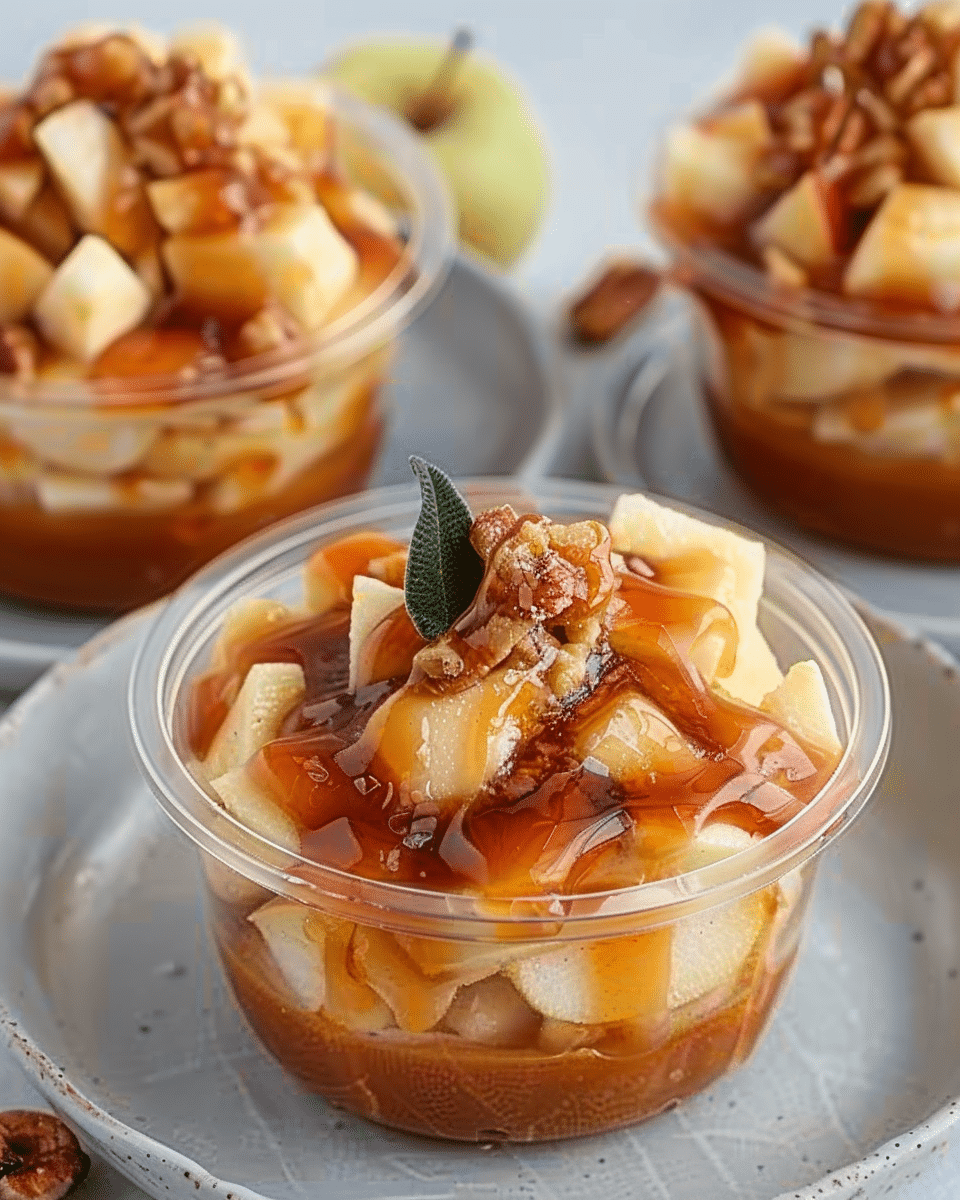
Why You’ll Love This Recipe
I love how easy and mess-free these dessert cups are to make, and even more, I appreciate how stunning they look when served individually. The flavors give me apple pie nostalgia without the work of rolling out dough. Plus, they’re great for parties, picnics, or any event where guests might want to grab and go with dessert in hand.
Ingredients
(Here’s a tip: Check out the full list of ingredients and measurements in the recipe card below.)
-
3 cups Granny Smith apples, peeled, cored and finely diced
-
⅓ cup light brown sugar, packed
-
3 tablespoons salted butter
-
1 teaspoon ground cinnamon
-
2 cups crushed vanilla wafers
-
¼ cup salted butter, melted and cooled
-
3.4 ounces instant vanilla pudding mix
-
1¼ cups cold whole milk
-
¾ cup salted caramel sauce, divided (¼ cup + ½ cup)
-
1 cup cold heavy whipping cream
Directions
-
I start by cooking the diced apples with brown sugar, butter, and cinnamon in a saucepan over medium heat. I stir often for 7–9 minutes until the apples are soft and the mixture thickens like pie filling. Then I stir in ¼ cup of salted caramel sauce and let it cool completely.
-
While the apples cool, I combine the crushed vanilla wafers and melted butter in a small bowl. I scoop about 2 teaspoons into each dessert cup and press it down to make the crust.
-
In a medium bowl, I whisk the cold milk and instant pudding mix until it thickens, which takes around 2–3 minutes.
-
I mix in the remaining ½ cup of salted caramel sauce, then add the cold heavy cream and beat everything together until the pudding is thick enough to pipe—this takes about 3–4 more minutes.
-
Using a piping bag, I fill the dessert cups about two-thirds full with the pudding mixture.
-
I top each one with a spoonful (about 2 teaspoons) of the cooled apples.
-
Finally, I place the lids on the cups and refrigerate until serving time.
Servings and Timing
-
Yield: 28 dessert cups
-
Serving Size: 1 cup
-
Prep Time: 30 minutes
-
Cook Time: 10 minutes
-
Total Time: 1 hour 10 minutes
Variations
-
I sometimes switch out the vanilla wafers for crushed graham crackers or ginger snaps for a spicier bite.
-
If I want to make it more indulgent, I drizzle extra caramel on top or add a dollop of whipped cream before serving.
-
I’ve also tried mixing a bit of cream cheese into the pudding for a cheesecake-like twist—it’s delicious.
-
For a nutty crunch, I sprinkle chopped pecans or walnuts over the apples.
-
Using different apple varieties like Honeycrisp adds a unique sweetness to the mix.
Storage/Reheating
-
I keep these covered in the refrigerator for up to 3 days.
-
When I need to make them ahead, I freeze them for up to a month and let them thaw in the fridge before serving.
-
These don’t need reheating—they’re meant to be served cold, which makes them even more convenient.
FAQs
How do I prevent the apple layer from getting soggy?
I let the apple mixture cool completely before adding it to the pudding layer. This keeps the layers firm and helps preserve the texture.
Can I use store-bought caramel sauce?
Absolutely. I use my favorite jarred salted caramel sauce for convenience, and it works perfectly.
Do I have to use Granny Smith apples?
Granny Smith apples add tartness that balances the sweetness, but I’ve used other apples like Fuji or Honeycrisp with great results.
Can I make these dessert cups a day in advance?
Yes, I often make them the night before a party. They hold up beautifully overnight in the fridge.
What’s the best way to crush the vanilla wafers?
I put them in a zip-top bag and crush them with a rolling pin—it’s quick and mess-free. A food processor also works well for finer crumbs.
Conclusion
These no-bake caramel apple dessert cups are one of my favorite fall-inspired treats. I get all the warm, spiced flavors of apple pie, layered with creamy pudding and a buttery crust, without turning on the oven. They’re simple, portable, and always a hit—whether I’m serving a crowd or saving a few in the fridge for a sweet afternoon pick-me-up.
Print
No-Bake Caramel Apple Dessert Cups
- Prep Time: 30 minutes
- Cook Time: 10 minutes
- Total Time: 1 hour 10 minutes
- Yield: 28 servings (cups)
- Category: Dessert
- Method: No‑Bake
- Cuisine: American
- Diet: Vegetarian
Description
Portable caramel apple dessert cups with a cookie crust, pudding layer, and cooked apples—no baking needed.
Ingredients
- 3 cups Granny Smith apples, peeled, cored and finely diced
- ⅓ cup light brown sugar, packed
- 3 tablespoons salted butter
- 1 teaspoon ground cinnamon
- 2 cups crushed vanilla wafers
- ¼ cup salted butter, melted and cooled
- 3.4 ounces instant vanilla pudding mix
- 1¼ cups cold whole milk
- ¾ cup salted caramel sauce, divided (¼ cup + ½ cup)
- 1 cup cold heavy whipping cream
Instructions
- Add the diced apples, brown sugar, butter and cinnamon to a 2‑3 quart saucepan over medium heat. Stir frequently, for about 7‑9 minutes, until apples soften and the brown sugar sauce thickens to an apple‑pie filling consistency. Stir in ¼ cup of salted caramel sauce. Allow the apples to cool completely.
- In a small bowl, stir together the crushed vanilla wafers and melted butter until fully coated. Add the buttered crumbs to the bottom of each dessert cup (using ~2 teaspoons per cup) and tamp down.
- In a medium bowl, mix cold whole milk and instant pudding mix until it begins to thicken (~2‑3 minutes).
- Mix in the remaining ½ cup salted caramel sauce into the pudding mixture.
- Add the cold heavy whipping cream and continue mixing until the pudding mixture has thickened enough to hold its shape when piped into the cups (~3‑4 minutes).
- Pipe the pudding on top of the cookie‑crumb crust, filling about two‑thirds of the cup.
- Spoon the cooled, cooked apples on top of the pudding layer (about 2 teaspoons per cup).
- Place lids on the cups and refrigerate until ready to serve.
Notes
- To Store: Covered dessert cups will keep in the refrigerator for up to 3 days.
- To Freeze: You can freeze the cups for up to 1 month.
- Make sure you use instant pudding, not the cook & serve kind.
- The apple pieces should be finely diced so they fit nicely in small dessert cups.
- The pudding mixture should be thick enough to hold its shape when piped into the cups.
Nutrition
- Serving Size: 1 cup
- Calories: 140 kcal
- Sugar: 13 g
- Sodium: 104 mg
- Fat: 8 g
- Saturated Fat: 4 g
- Unsaturated Fat: 4 g
- Trans Fat: 0.1 g
- Carbohydrates: 18 g
- Fiber: 0.5 g
- Protein: 1 g
- Cholesterol: 19 mg

