This Oreo Cream Chocolate Roll is a delightful dessert that combines the richness of chocolate with the irresistible crunch of Oreo cookies. It’s a soft, spongy cake rolled up with a luscious, creamy filling, making it the perfect treat for any occasion. Whether you’re looking to impress guests or indulge in a sweet treat for yourself, this chocolate roll is sure to satisfy your cravings.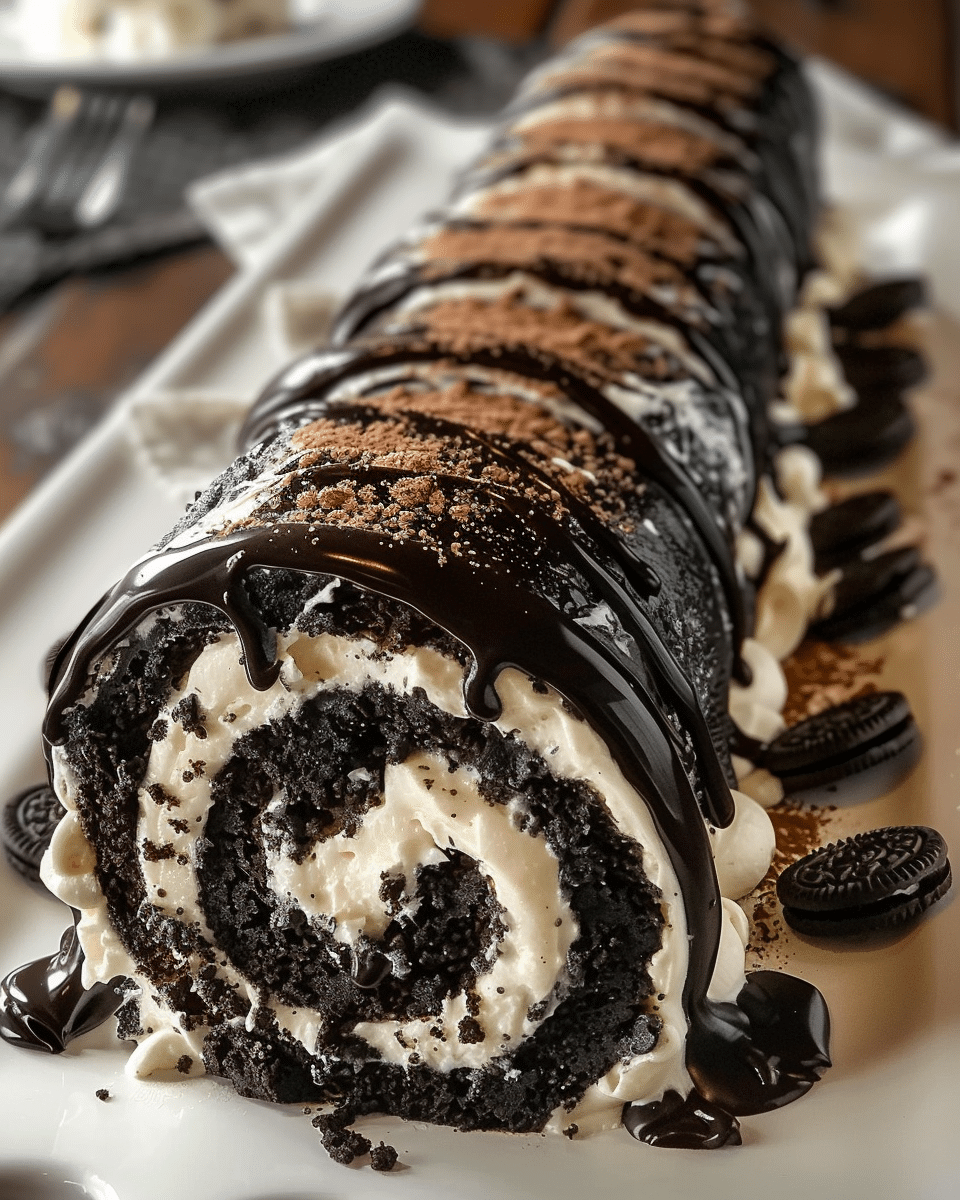
Why You’ll Love This Recipe
I love how easy this recipe is to make, yet it tastes like a professional dessert. The combination of the light chocolate sponge and the smooth, creamy Oreo filling creates a perfect balance of flavors and textures. Plus, it looks stunning when sliced, making it an excellent choice for serving at parties or family gatherings. It’s also versatile—if I want to mix things up, I can try different fillings or toppings, but the classic Oreo cream filling is hard to beat!
Ingredients
-
1 cup all-purpose flour
-
1/4 cup unsweetened cocoa powder
-
1/2 teaspoon baking powder
-
1/4 teaspoon salt
-
4 large eggs
-
3/4 cup granulated sugar
-
1 teaspoon vanilla extract
-
1/2 cup heavy cream
-
1/2 cup powdered sugar
-
1 package Oreo cookies (about 15-18 cookies)
(Here’s a tip: Check out the full list of ingredients and measurements in the recipe card below.)
Directions
-
Preheat the oven to 350°F (175°C) and line a 9×13-inch baking pan with parchment paper.
-
In a medium bowl, combine the flour, cocoa powder, baking powder, and salt. Set aside.
-
In a separate large bowl, whisk the eggs and granulated sugar until light and fluffy, about 3-5 minutes. Add the vanilla extract and mix well.
-
Gradually add the dry ingredients to the egg mixture, folding them in gently with a spatula until combined. Pour the batter into the prepared baking pan and spread it evenly.
-
Bake for about 12-15 minutes, or until the cake is set and a toothpick inserted in the center comes out clean.
-
While the cake is baking, prepare the Oreo filling. Place the Oreo cookies in a food processor and pulse until they become fine crumbs. In a separate bowl, whip the heavy cream with powdered sugar until it forms soft peaks. Gently fold in the Oreo crumbs.
-
Once the cake is done, remove it from the oven and let it cool for a few minutes. Then, invert the cake onto a clean kitchen towel dusted with powdered sugar and carefully peel off the parchment paper.
-
Spread the Oreo cream mixture evenly over the cake, leaving a small border around the edges. Gently roll the cake from one end to the other, using the towel to help with the rolling process.
-
Once rolled, transfer the cake to a serving plate. Optionally, dust the top with powdered sugar or additional crushed Oreos before serving.
Servings and timing
This recipe makes about 8-10 servings. The total preparation time is around 30 minutes, with an additional 15 minutes for baking, and about 20 minutes for cooling and assembling the roll. The entire process should take roughly 1 hour.
Variations
-
For a minty twist, you can replace the regular Oreo cookies with mint-flavored Oreos, giving the roll a refreshing flavor.
-
You can also add some chocolate chips to the cream filling for extra texture and sweetness.
-
If you prefer a lighter roll, try using a sponge cake instead of the chocolate cake base for a fluffier texture.
Storage/Reheating
The Oreo Cream Chocolate Roll should be stored in an airtight container in the fridge for up to 3 days. I recommend letting it sit at room temperature for a few minutes before serving for the best texture. You can also freeze the roll by wrapping it tightly in plastic wrap and then in aluminum foil. It will stay fresh in the freezer for up to 1 month. To serve after freezing, simply thaw it in the fridge for several hours.
FAQs
How do I prevent the cake from cracking when I roll it?
To avoid cracking, make sure the cake is slightly cooled but still soft when rolling. Rolling it with a towel while it’s warm helps keep it pliable.
Can I make the Oreo cream filling ahead of time?
Yes, you can prepare the filling a day in advance and store it in the fridge until you’re ready to assemble the roll.
Can I use a different kind of cookie for the filling?
Absolutely! You can experiment with different cookie flavors, like Chips Ahoy, or even add a combination of cookies for a unique twist.
How can I make this dessert even more indulgent?
Try drizzling melted chocolate or caramel over the roll after it’s been assembled for an extra indulgent touch.
Can I make this without a food processor?
If you don’t have a food processor, you can crush the Oreos in a sealed plastic bag using a rolling pin until they’re finely crumbled.
Conclusion
This Oreo Cream Chocolate Roll is an easy yet impressive dessert that blends rich chocolate and the beloved Oreo flavor into a stunning roll. I love how versatile it is and how it can be customized to suit my tastes. Whether I’m serving it at a special event or just enjoying a treat at home, it’s always a hit!
Print
Oreo Cream Chocolate Roll
- Prep Time: 10 minutes
- Cook Time: 20-25 minutes
- Total Time: 35-40 minutes
- Yield: 6-8 muffins
- Category: Side dish, Snack
- Method: Baking
- Cuisine: Italian
- Diet: Vegetarian
Description
These golden crust garlic rosemary focaccia muffins offer a delicious twist on traditional focaccia bread with a crispy, golden exterior and a soft, fluffy interior. The savory flavors of garlic and rosemary come together in a convenient, portable muffin form.
Ingredients
- 1 ½ cups all-purpose flour
- 1 ½ teaspoons baking powder
- ½ teaspoon salt
- 2 tablespoons olive oil
- ½ cup warm water
- 2 teaspoons dried rosemary (or fresh, finely chopped)
- 2 cloves garlic, minced
- 1 tablespoon honey
- ¼ cup grated Parmesan cheese (optional)
- 1 tablespoon melted butter (for brushing)
- Extra rosemary and garlic for garnish (optional)
Instructions
- Preheat the oven to 375°F (190°C) and grease a muffin tin or line it with paper liners.
- In a large bowl, mix together the flour, baking powder, and salt.
- In a separate small bowl, combine the warm water, olive oil, honey, and minced garlic. Stir until the honey dissolves.
- Pour the wet ingredients into the dry ingredients and stir until a dough forms. Fold in the rosemary and Parmesan cheese, if using.
- Spoon the dough into the muffin tin, filling each cup about ¾ full.
- Bake in the preheated oven for about 20-25 minutes, or until the muffins are golden brown and a toothpick inserted comes out clean.
- Remove the muffins from the oven and brush with melted butter for an added shine and flavor.
- Optional: Sprinkle extra rosemary and garlic on top before serving for an extra pop of flavor.
Notes
- These muffins can be made ahead of time and stored in an airtight container.
- For a cheesy version, add shredded mozzarella or cheddar to the dough.
- Feel free to experiment with different herbs like thyme, oregano, or basil.
- To freeze, wrap each muffin tightly and store in a freezer bag for up to 3 months.
Nutrition
- Serving Size: 1 muffin
- Calories: 200
- Sugar: 2g
- Sodium: 250mg
- Fat: 10g
- Saturated Fat: 2g
- Unsaturated Fat: 7g
- Trans Fat: 0g
- Carbohydrates: 24g
- Fiber: 1g
- Protein: 4g
- Cholesterol: 10mg


