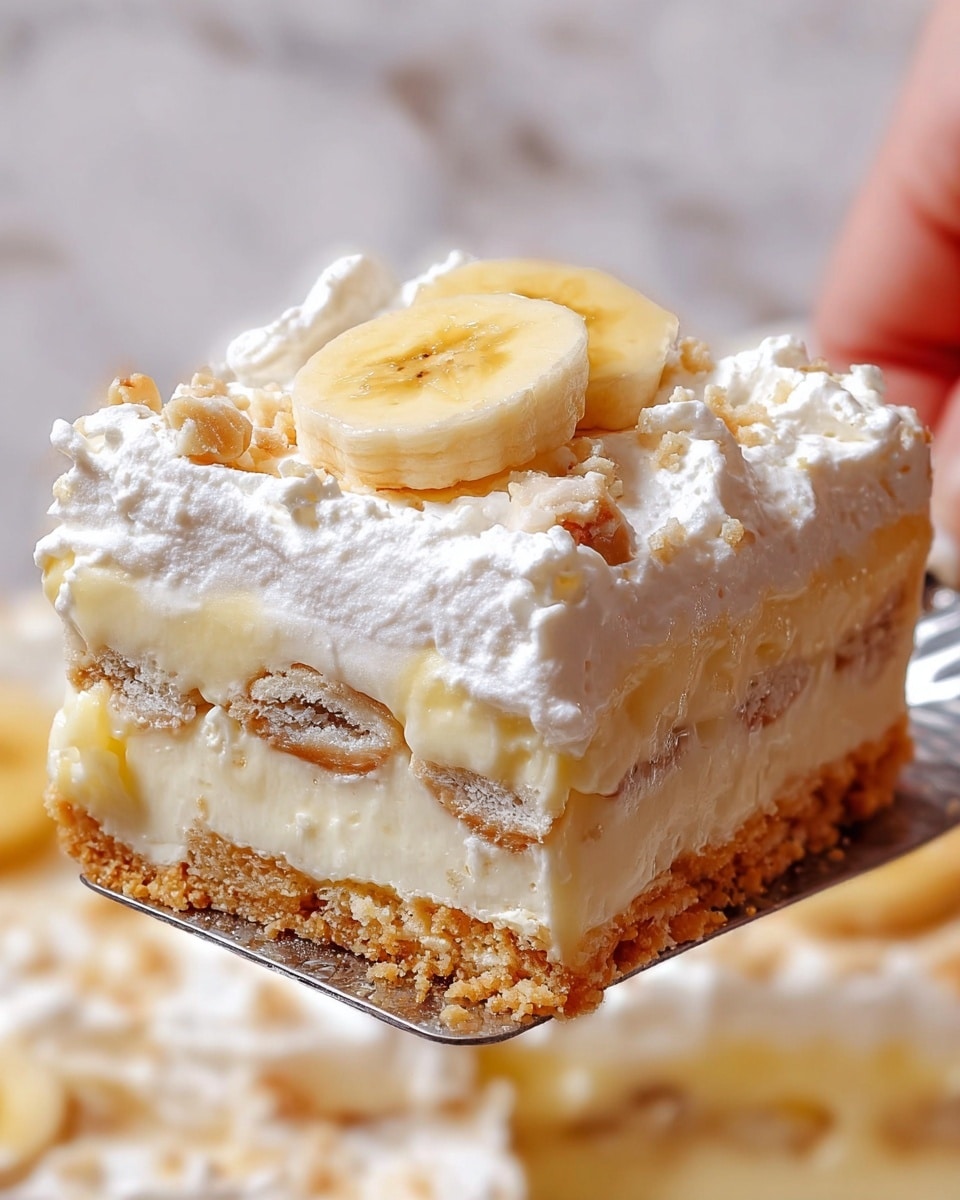
I love making this No Bake Banana Pudding Lasagna when I want a creamy, layered dessert without turning on the oven. It combines a buttery cookie crust, rich cream cheese filling, banana pudding, and fresh banana slices into a chilled treat that is perfect for family gatherings, holidays, or any time I want an easy dessert that looks impressive.
Why You’ll Love This Recipe
I enjoy this recipe because it is simple to prepare and requires no baking. The layers create a beautiful presentation while delivering a delicious combination of creamy, sweet, and fruity flavors. I also like that I can make it ahead of time, allowing the dessert to chill and develop even better texture before serving. It is a crowd-pleasing dessert that works for both casual and special occasions.
Ingredients
(Here’s a tip: Check out the full list of ingredients and measurements in the recipe card below.)
For the crust:
36 vanilla wafer cookies, crushed
1/2 cup (113 g) unsalted butter, melted
For the cream cheese layer:
8 oz (226 g) cream cheese, softened
1 cup (120 g) powdered sugar
1 container (8 oz/227 g) whipped topping, divided
For the pudding layer:
2 boxes (3.4 oz each) instant banana pudding mix
3 cups (720 ml) cold milk
For the topping and layers:
3 medium bananas, sliced
Remaining whipped topping from the container
8 to 10 vanilla wafer cookies, crushed for garnish
Directions
I combine the crushed vanilla wafer cookies and melted butter in a bowl until the mixture resembles wet sand.
I press the mixture firmly into the bottom of a 9×13-inch dish to create an even crust.
In a separate bowl, I beat the softened cream cheese and powdered sugar until smooth and creamy.
I fold half of the whipped topping into the cream cheese mixture.
I spread the cream cheese layer evenly over the prepared crust.
In another bowl, I whisk together the banana pudding mix and cold milk for about 2 minutes until it begins to thicken.
I arrange the sliced bananas over the cream cheese layer.
I spread the banana pudding evenly over the bananas.
I top everything with the remaining whipped topping, smoothing it into an even layer.
I sprinkle crushed vanilla wafer cookies over the top for garnish.
I cover the dish and refrigerate it for at least 4 hours, or overnight for the best texture.
I slice and serve chilled.
Servings and Timing
Servings: 12 servings
Prep Time: 20 minutes
Chill Time: 4 hours
Total Time: 4 hours 20 minutes
Variations
I sometimes use vanilla pudding instead of banana pudding for a milder flavor.
I like adding a layer of caramel sauce between the pudding and whipped topping.
I occasionally mix crushed banana cream cookies into the crust for extra flavor.
I use homemade whipped cream when I want a richer dessert.
I add chopped pecans or walnuts for a bit of crunch.
Storage/Reheating
I store leftovers covered in the refrigerator for up to 3 days. Since the bananas naturally soften over time, I prefer serving the dessert within the first two days for the freshest flavor and texture. This dessert is not suitable for reheating because it is meant to be served cold. If I need to prepare it ahead, I make it the night before and keep it refrigerated until serving.
FAQs
Can I make this dessert ahead of time?
Yes, I often prepare it a day in advance. Chilling overnight helps the layers set beautifully and improves the flavor.
Can I use homemade whipped cream instead of whipped topping?
Yes, I can substitute freshly whipped cream. I make sure it is whipped to stiff peaks so the layers remain stable.
How do I keep the bananas from browning?
I assemble the dessert shortly before chilling and keep it covered. A light coating of lemon juice can also help slow browning.
Can I freeze No Bake Banana Pudding Lasagna?
I do not recommend freezing it because the pudding and bananas may change texture once thawed.
What type of cookies work best for the crust?
I prefer vanilla wafer cookies because they complement the banana flavor perfectly, but graham crackers also work well.
Conclusion
I find this No Bake Banana Pudding Lasagna to be one of the easiest and most satisfying desserts to prepare. The creamy layers, sweet bananas, and crunchy cookie crust create a wonderful combination of textures and flavors. Whether I am making it for a party, holiday gathering, or simple family dessert, it always earns compliments and disappears quickly.
A hearty and comforting easy ground beef casserole made with tender egg noodles, savory tomato beef sauce, and melted cheddar cheese, perfect for busy weeknight dinners.
Ingredients
1 pound (450 g) lean ground beef
1 medium yellow onion, diced
2 cloves garlic, minced
2 cups (200 g) uncooked egg noodles
1 can (15 oz / 425 g) tomato sauce
1 can (14.5 oz / 411 g) diced tomatoes, drained
1 teaspoon Italian seasoning
1 teaspoon salt
1/2 teaspoon black pepper
1 cup (240 ml) beef broth
2 cups (225 g) shredded cheddar cheese
1 tablespoon olive oil
2 tablespoons chopped fresh parsley (optional)
Instructions
Preheat the oven to 375°F (190°C) and grease a 9×13-inch baking dish.
Cook egg noodles according to package instructions until al dente, then drain and set aside.
Heat olive oil in a large skillet over medium heat and sauté the onion for 3–4 minutes.
Add garlic and ground beef, cooking until browned and fully cooked.
Drain excess fat, then stir in tomato sauce, diced tomatoes, beef broth, Italian seasoning, salt, and pepper.
Simmer for about 5 minutes to blend flavors.
Mix in cooked noodles until evenly coated with the sauce.
Transfer mixture to the prepared baking dish and spread evenly.
Top with shredded cheddar cheese.
Bake for 20–25 minutes until cheese is melted and bubbly.
Rest for 5 minutes before serving and garnish with parsley if desired.
Notes
You can substitute ground turkey for a lighter version.
Add vegetables like mushrooms, bell peppers, peas, or spinach for extra nutrition.
Use mozzarella or Monterey Jack cheese instead of cheddar if preferred.
Add red pepper flakes for a spicy kick.
This casserole can be assembled ahead of time and refrigerated before baking.
Leftovers can be stored for up to 4 days in the refrigerator or frozen for up to 3 months.
Add a splash of broth when reheating to keep it moist.


